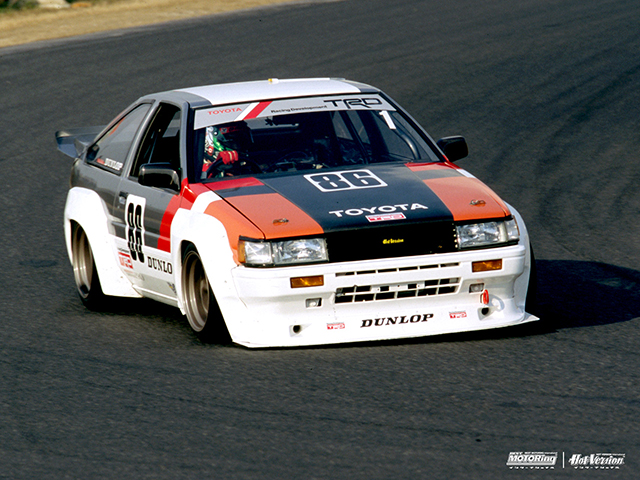
Probably the most important thing you can do to your ae86 is alter the suspension. Lets face it, this is probably the most rewarding thing you can do to a car overall…it’s what turns simple cars like the ae86 and civics into giant killers. The important thing to remember is, no matter what, do not unbalance the car or destroy its dynamics while you’re doing it! We all want a car that drives like a go cart…but you can over stiffen a chassis, or alter it enough that it drives like Henry the VIII’th, or worse, a waterbed. Be careful, slow and methodical and you will be rewarded.
Someone once told me that the ae86 was designed to be flexible. That is to say, its chassis was built to flex and twist with the demands put upon it. This may seem like a bad idea at first, but stop and think about it for a second. A perfectly stiff platform relies on its suspension to keep it in contact with the road.
In a time where stiff wasn’t possible like today, what would you do to keep tires on the road? With technology being a creature of leaps and bounds, sometimes what was a good idea decades ago isn’t one now and vice-versa. Either way, the springy-ness of the car’s chassis is one of the things that gives it it’s “fun to drive” moniker and a natural balance found only in a driver’s car. Disrupt this, and you’ve got a car that will literally ride like ass. In short, don’t over suspend your car.
So, probably the most common questions asked about ae86 suspensions are, what are its components, how are they improved upon, and what kind of aftermarket parts are available? There are three distinct types of modifications you can make, you can do most of them at home with basic hand tools and all of them will put a smile on your face.
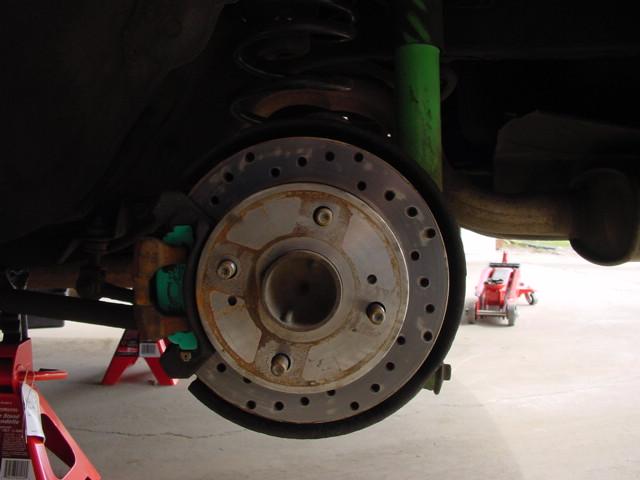
The ae86 has an interesting cobble of suspension acumen. The front consists of (then) cutting edge MacPherson struts, sway bar and single lower control arms with a high roll center. The rear consists of a 5-link, twin-armed solid axle with a central locating panhard rod and sway bar. Now, while the front suspension was cutting edge, the rear certainly wasn’t. In fact, the rear suspension of the ae86 is more akin to drag racing than road racing.
The book “How to make your car handle” characterized this style of suspension as horrible for anything but going in a straight line. The author Fred Puhn must not have driven this car. Either way, there certainly appears to be lots to improve upon.
The ae86 stock suspension is great fun to drive on, but it lacks the reinforcement or support a driver looks for in a car. Body roll is available at any speed in any corner, though the rest of the ride is predictable and controlled with just a touch of understeer. If it were not for the amazing factory equipped seats (voted best OEM seats ever by S.C.C.!), I’m sure the car would be somewhat daunting to drive. The only downside is that it drives amazingly well. Some might say it was even inspiring…for a twenty year old car. Bottom line is, the ae86 suspension simply cannot hang with today’s entry level performers.
At least, not without some aftermarket weaponry. ;-) The first stage of ae86 suspension modification is replacing the moving parts.
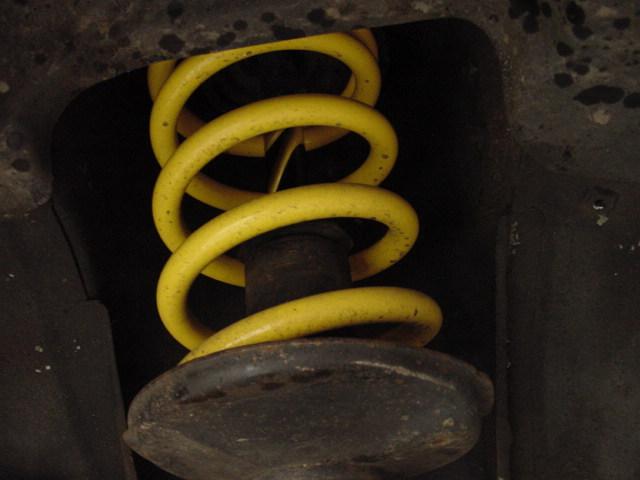
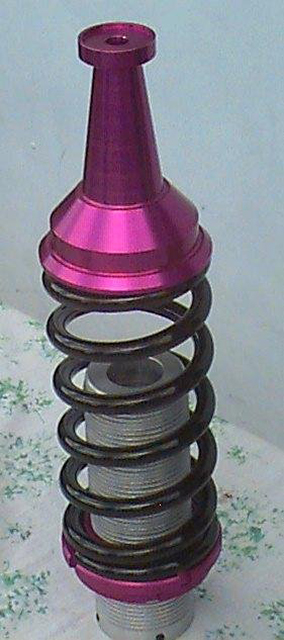
Usually the first place the tuner enthusiast goes to town on the ae86 suspension is springs. Changing springs on a car is the second fastest way to adjust its looks besides wheels. It’s also easy to do. Lastly, it’s also very dangerous and can have huge repercussions on the way the car drives…possibly making it un-drivable! It is possible to buy springs that are too soft, too stiff or too short to be useful on the street. Make sure you’re buying something that works for your application. Companies like Eibach, H&R and Tokico are great places to start, especially Tokico. Each of these companies have quality springs with minimal lowering that ride well on the street while giving you a good look and driving dynamics. They’re also quite moderate in their ratings, being intended for everyday street cars.
Tokico goes so far as to make suspension kits for cars that include springs, shocks and sway bars all in one balanced package, which is awesome for the entry level enthusiast. There are many other companies who make springs and shocks for the ae86, but most are Japan-based. I recommend buying setups like this because the shock and spring are sold as a matched set. This takes some of the guesswork out of it for the enthusiast. You can buy springs and shocks separately (which is probably most common for ae86’s in North America), but you have to make sure that the springs are the right height and rate and that the shock is actually strong enough to stop them.
So, with that come some warnings. Having springs that are too stiff will cause the car to drive like a camel, which isn’t pleasant. OEM spring rates were about 1.5-2kg/mm front and rear, though I only tested old springs. Look for rates in the 4kg/mm to 7kg/mm for the front and 3kg/mm to 5.7kg/mm for the rear.
Try to maintain a 4:3 ratio in your spring rates from front to rear to get good balance. Obviously, you’re going to have your own personal preference as to what you like, but unless you can drive other people’s cars with the setups you’re looking at, trial and error is the only way to go. Having one end of the car too stiff will cause that end of the car to be loose on the road, meaning it will slide out before the other end does…leading to understeer or oversteer.
Having springs that are too short will cause the car’s control arms to top out in their travel early which leads to a car that can’t absorb road hazards and doesn’t want to turn…both of which are conditions that are unbearable and dangerous. Basically the car will have no control on anything but perfectly smooth roads. Remember, springs are there to allow the car to absorb imperfections in the road, and the entire car’s weight rides on them…and that’s it. They aren’t meant to stop body roll or anything else…so don’t buy springs that are stiff thinking this is better. They’re there to make sure your tires stay on the road where they belong.
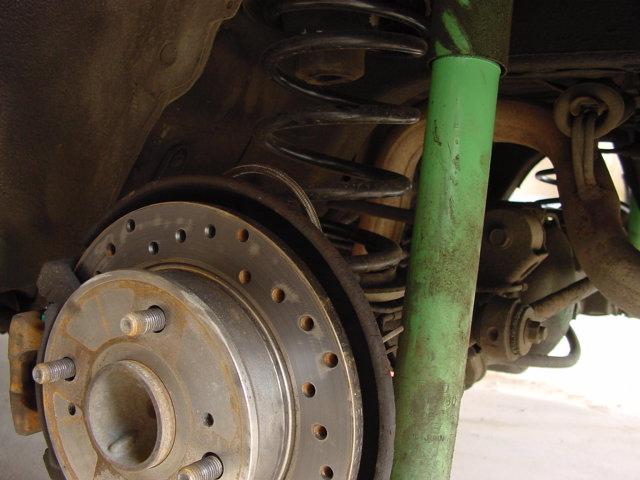
Properly called dampers (but shocks in layman’s terms), a shock’s purpose is to stop the spring from oscillating (moving up and down) by absorbing (damping) this motion by adding resistance to the spring’s movement. They add friction to stop the spring from moving, slowly and controllably, while allowing the spring to absorb the motions of the car. It sounds more complicated that it really is. Hopefully that makes sense, at which point it should be immediately obvious as to why the shock must match the spring. If the damper isn’t strong enough to stop the spring, the car will continue to bounce up and down after it hits a bump in the road, which is keeping your tires from being able to steer the car. This basically means that you’re out of control (at least to some degree). If the damper is too strong, the spring won’t be able to absorb enough of the road before the shock stops it from moving, resulting in a harsher ride and forcing your tires to pick up the slack. While I’ve never seen a shock so big that it was a hazard, I just wanted to illustrate the other extreme. The other variable is travel. If the spring and shock do not match for travel (distance from maximum compression to maximum extension), one of them is going to be damaged quickly. Short springs require dampers with short, powerful strokes to stop them, long springs require long stroke dampers. You can imagine what would happen if one of these two stopped and the other tried to keep going for several inches with two tons of car behind it. Something’s got to give. If the damper is too long, odds are good that the spring will unseat, which is unsafe and potentially lethal to both car and driver as you may lose total control of the car. If it is too short, the damper will be pulled open and pushed closed too far by the weigh of the car, resulting in its internal bits being smashed to pieces and it failing rapidly.
I ran an Eibach Pro Kit spring set on my car for years with great results. The ride height wasn’t quite where I wanted it in terms of appearance, but they performed admirably. Also, they were reserved enough that I discovered only a minor damper upgrade to Monroe Sensatrac shocks was required. I was quite impressed by this setup and word spread. Keep in mind, this was more than a dozen years ago…and this suspension kit became very popular in Canada since then. It’s a great budget suspension, but it’s still a budget suspension. I sold my Eibach springs in favor of Checkman N2 springs. These springs were literally half the free height of the Eibachs they replaced, but apparently retained the same spring rate because they were way too soft…and were so short that the Monroe dampers died within three months of installation. The car became a nightmare to drive and I soon threw the entire system away in favor of circle-track car springs that I bought out of a catalogue from Afco.
This allowed me to pick my rate and height as I saw fit. I should point out that I’m very familiar with spring physics, and that I did several calculations before making a selection. If you want to go the same way, make sure you know what you’re doing or get help. Because these springs were still short, I opted for some TRD short stroke oil-damped shocks. While basically a “dead” shock (having no pressure, only resistance to change in direction) they damp the Afco’s admirably. I currently debate replacing the springs again, with something a little more moderate for the mine field they call our potholed streets. The Afco springs I chose resulted in a drop of about two inches over the dead stock springs, while having a rate of 6kg/mm front and 5kg/mm rear. This wouldn’t be enough for smooth roads, but is too much for the gopher field I drive on so perhaps a 5/4 ratio would be more appropriate. Time will tell.
Now, that’s nowhere near the end of suspension theory as it pertains to the ae86. In fact, we’ve really only scratched the surface.
Because we’ve just lowered the car, this has thrown a few of the OEM pieces out of whack. As the front suspension has been lowered, the lower control arms at the front of the car have just lost several inches of travel.
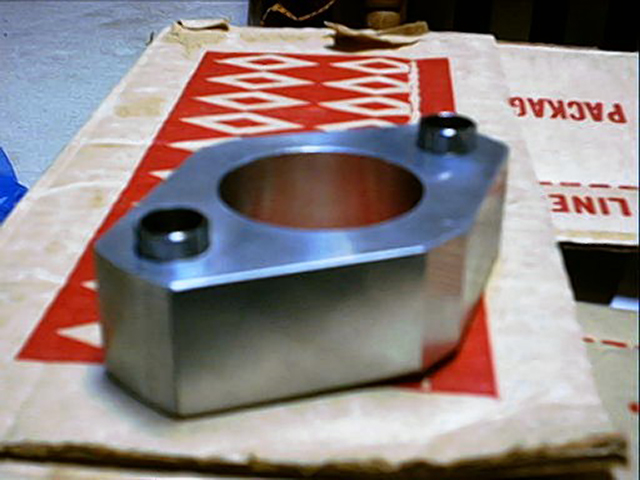
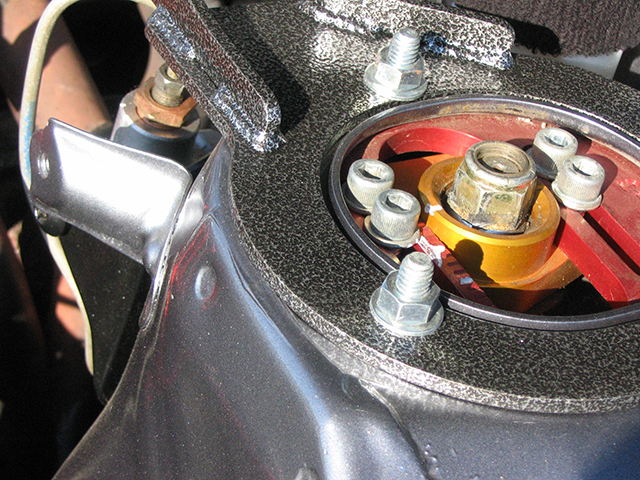
This will result in a lower “roll center” (the line around which the center of the car’s weight pitches during cornering centered at the point where the axes of the control arms meet) and unpredictable handling at the limit. So, we need to get the travel back into those control arms to raise the roll center. This is done by adding in a piece called a Roll Center Adjuster (or RCA). It’s basically a block of aluminum that bolts in between the strut and steering knuckle to take up the space left behind by lowering the car. This is something that has to be done, no matter the amount of lowering, and ideally the RCA block should be equal in height to the amount you lowered the car so that the total length of the suspension remains the same with the car’s weight applied. You also have the option of using a Negative Roll Center Adjuster (or NRCA). This piece does the same job as the RCA, but gives you the option of a second set of bolt holes that are positioned more towards the outside of the car. This allows seasoned tuners to dial in negative camber, which is ideal under some driving conditions where you want the car to have wicked turn-in response and steering input. It also widens the front track of the car slightly.
Something similar happens out back. Because the rear of the car has been lowered, the axle is now sitting closer to the body of the car than before. This is when you’re supposed to realize something like…”but the suspension arms are still the same length!” and have an epiphany. Don’t worry, someone else had that for you in Japan twenty years ago.
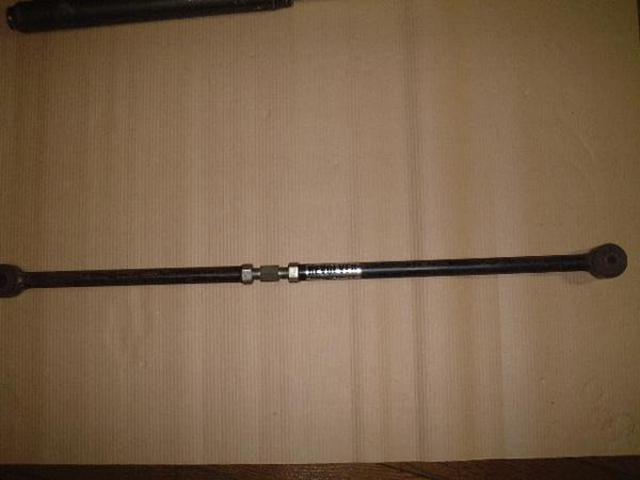
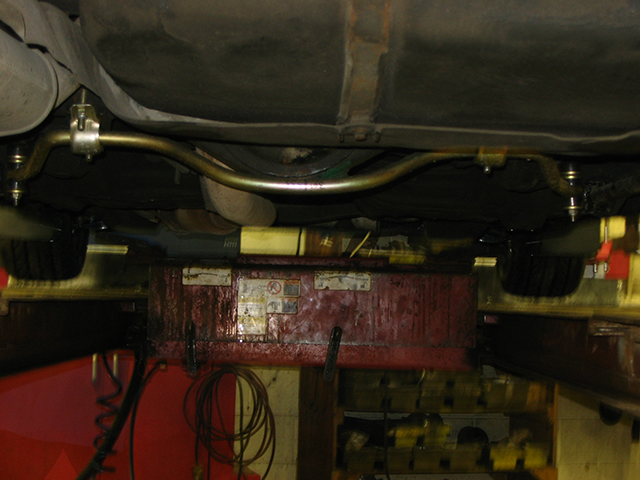
Due to the nature of these suspension links, as the car is lowered, the panhard rod pushes the axle towards the driver’s side of the car. Because the other arms are still in the same spots, the axle also twists slightly and all of this results in the car “crab walking” down the road. Now, this isn’t much…I think I measured the axle being over to the driver’s side by Ľ” or ˝”…but it’s enough to feel while you’re driving. The easy way to fix this is to buy an adjustable or short panhard bar and install it in the rear. This will re-center the axle and keep everything happy. An adjustable bar is easily set during an alignment by your local technician.
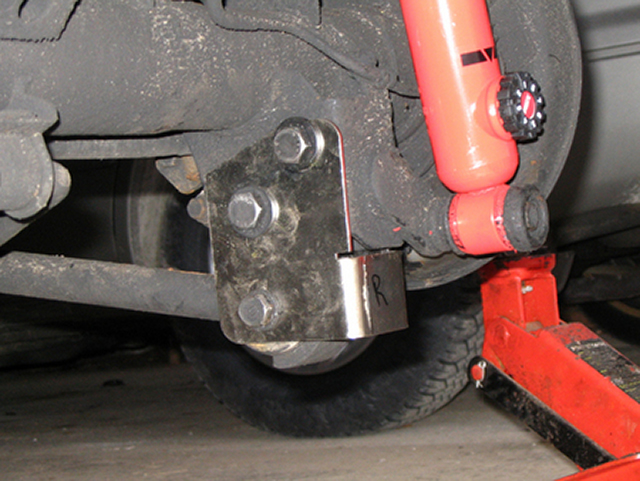
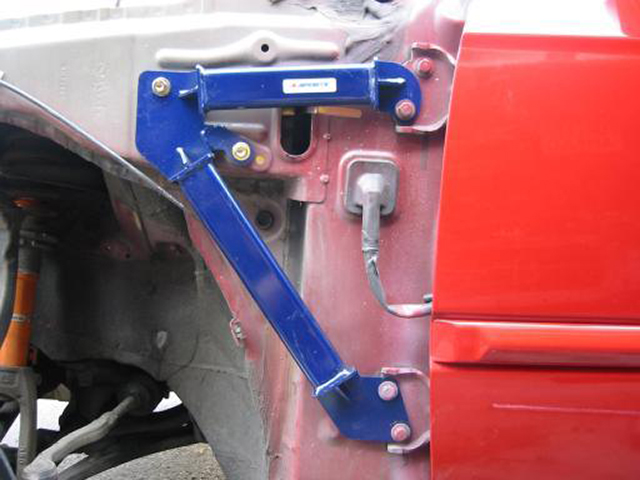
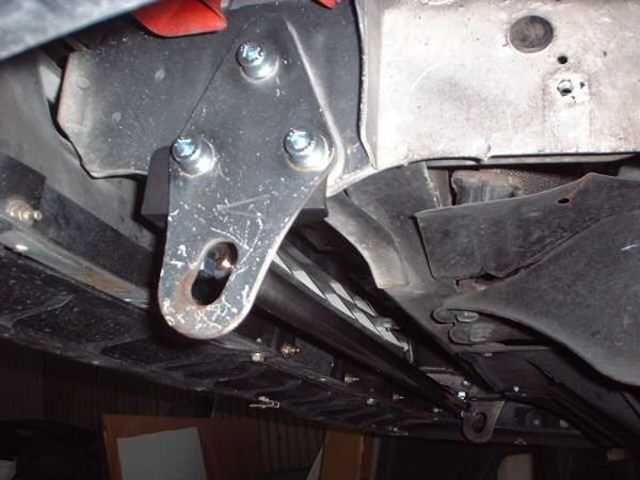
The other thing to worry about is the lower axle control arms. Because of the shape of the mounting points on the body, these arms will run out of travel as the axle moves towards the body much like the arms in the front of the car. The solution to this problem is much the same as the front. A piece called a “traction bracket” must be bolted to the axle. A traction bracket resembles a leaf-spring shackle in many ways, and is basically just an extension that is added to the OEM shackle mount on the axle itself. All it does is extend the mount down, which changes the angle on the upper mount, which stops it from topping out, resulting in a happy car!
The difference the panhard bar and traction brackets provide isn’t immediately obvious, but it is apparent over time. Basically, with these modifications, the axle will feel more controlled and relaxed. Before I performed these modifications the rear end of the car felt jumpy like it was skittering over bumps and road going imperfections. But no longer, smooth roads are now smooth. The difference is so subtle that I initially dismissed any benefits as non-existent…but there IS a difference, and I recommend that you get these parts if you don’t already have them. You don’t need the biggest, baddest traction brackets around either, so the folded or stamped kind will do nicely. Make sure if they’re welded pieces that they’re straight before you install them. Some of the aftermarket cheaper ones aren’t made with the attention to detail we’d all like to have so be careful. Mine required massive adjustment on one side because the guy who welded it up was absolutely drunk at the time…and true to fly by night companies there was zero support after the sale. A gift from a friend, I don’t think anybody was really impressed by them, though once we fixed them they worked well.
On a side note, you may have noticed that in some Japanese N2 cars, the rear seat has been removed and two giant bulkheads have been installed. This is to lengthen these lower arms and raise the car end up enough that travel isn’t a problem under race conditions. To do this, they have to bring them into the interior where the rear seat is. This is overkill for a street car, but kits are available and you’re welcome to install one if you think you need it.
Lowering an ae86 adds one more side effect you should be aware of. Camber. Typically, dropping an ae86 adds somewhere between one and three degrees of negative camber to the front tires. This is by no means a dangerous thing, though you should get it balanced so that the two sides are equal during your alignment. Adding a camber plate system allows you to do this with ease, as well as dial camber in or out on a whim.
A camber plate is really just a strut-top replacement with a slider in it that can be loosened, moved and re-fastened without removing the entire suspension from the car. This saves time, and prevents you from having to redo the entire alignment. Lots of camber isn’t a good thing per say, as camber slowly eats away at tires. Camber can increase front end turn in and steering bite. Ideally, you’d have none at all and you need the plates to get to zero. I find that having a bit of negative camber is nice and like to set my car to have one degree of negative camber. Depending on which brand of plate you buy, you may also have the option of strut travel extensions. This secondary piece allows the suspension a bit more travel while maintaining the same ride height by allowing more vertical suspension movement. Also, watch out for low-end camber plates. Some of the slots in these plates are not perfectly straight, which forces you to dial in caster as you dial in camber and vice-versa…which isn’t a desirable condition. Mine are like this, and I’m not happy about it. They were free, so the price was right, but watch out none the less.
For me, the most important reason to do suspension work was to get rid of body roll. I find that lack of body roll is what inspires confidence in a car’s ability to handle…and though this is misguided, it’s my honest opinion.
Nothing is more terrifying than having someone dive deep into a corner in an unfamiliar car with you as passenger and feeling the top tip over to the point where you could reach out and drag your knuckles on the ground. It’s unsettling. I made the newbie mistake of thinking that increasing spring rates would solve this problem…and it did with the added expense of ride comfort. Granted, this was more than a decade ago, but I still look back at it and chuckle at my inexperience. The secret is sway bars.
Now, not all ae86 are created equal in this regard. It is my understanding that many American ae86’s did not come with rear sway bars, while the Canadian version came with front and rear regardless of model. Either way, they need to be upgraded. A sway bar is basically a giant spring. Motion put to one end is resisted by movement at the other. Movement at both is allowed as long as it is in the same direction. So, if the car leans to one side, the car pushes down on that end of the bar. This in turn pushes down on the other end of the bar which is against the other side of the car…which pushes back. This countering action stops the car from leaning. With sway bars, it is very important to have a balanced pair. Having too much front roll stiffness will result in the inner front tire lifting during cornering, which cuts half your front end traction and steering ability. Having too much rear roll stiffness will cause the car to lift the inner rear tire during cornering. Balanced, the car will corner flat with no tire lifting what so ever. About the only thing you need to know about sway bars are that they are sized in diameters (measured in millimeters or inches), some of them are hollow, and that there are various manufacturers like Do-Luck, Cusco, TRD, Tanabe, Suspension Techniques and others. Be careful with TRD bars because the TRD rear bar is the same as the OEM ae86 rear bar…it’s just intended as an upgrade for non-sway bar equipped cars. <
I chose to go with Addco sway bars, and for several reasons. First of all, it’s the largest sway bar available for the ae86…and seeing as I hate body roll this seemed like the logical choice. Secondly, Addco is the largest sway bar manufacturer on the planet, fabricating most of the OEM bars and many of the aftermarket bars (even TRD)…something like 96% of sway bars are made by them. Thirdly, they are made of cadmium plated grade eight steel, came with all installation hardware and a free optional urethane end-link upgrade. Lastly, shipping was free and the price was superb! Installation was a breeze, taking an afternoon and a friend to help hold the bar in place while things were fastened. The only downside was that I had to use longer fasteners for the front mounts as the urethane bushing was too stiff to reuse the OEM bolts. As with most of these suspension mods I’m talking about, this one changed the car to the point where cornering was fearless at any speed, easily outpacing my courage.
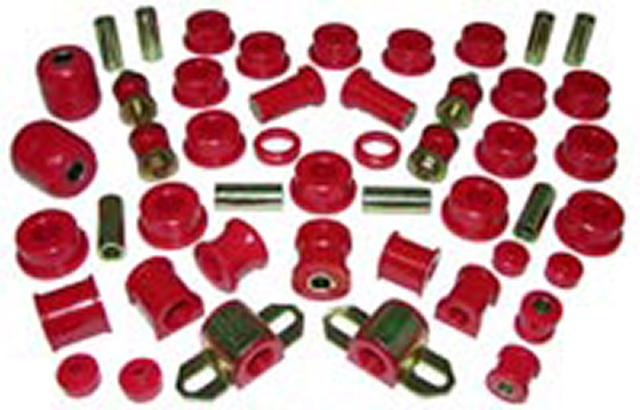
One of the most overlooked places to find performance in your suspension is your bushings. Your car’s suspension is full of rubber bushings, usually in places where one suspension joint meets another. Like with any rubber product, over time these pieces dry up and wear out. This leads to a squeaky, clunky, sloppy car that has a rough ride and makes all kinds of interesting noises. The easy solution is to replace them!
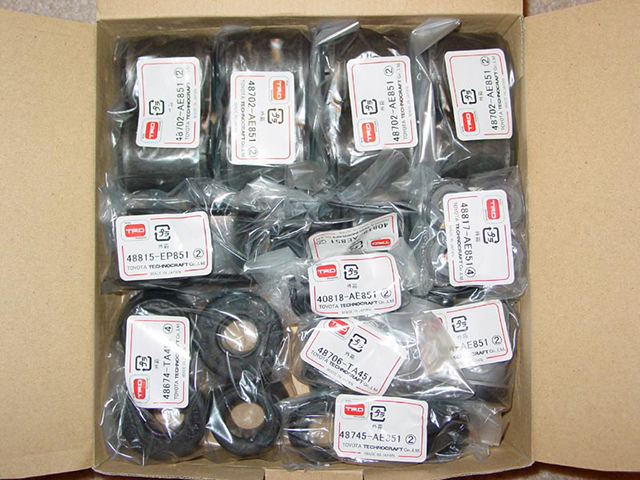
Now, you have two options when replacing bushings: Urethane or rubber. Urethane is a harder plastic that has longer life, better durability and less flexibility which is good if you want accurate suspension movement. A downside is urethane squeaks so it has to be lubricated frequently…and there’s nothing more annoying than a squeaky car. The other downside is nobody makes a urethane kit for the ae86…you have to take out your bushings and match them piece by piece out of various urethane bushing catalogues at your local store and will then probably have to special order them in. Because of all of that, I’d go rubber. Rubber is easier to work with than urethane and is readily available from TRD and a few other Japanese manufacturers. TRD actually makes a rubber bushing kit that replaces every single bushing in the entire ae86 from end to end that is available in North America. It requires no lubrication and only requires basic hand tools to install the majority of. The rear end links and front control arms will require the use of a shop press, which I managed to find at a local DIY rental-bay garage for something like $10 an hour.
If you’re not mechanically inclined, any mechanic should be able to do this for you. It does take down time as you have to take the entire car apart and put it back together again…but it’s easier than it sounds. If you do go the TRD way, just make sure that you realize the rear bushings are actually OVAL and not round like they look, or else they won’t go in properly and you’ll have to find a dealer that can pull the bushings in from Japan. The easy way is, line them up like they came out using the rubber nubs on the outside and everything will be okay. Also, make sure that you jamb some sockets or something into the front control arms when pressing those bushings, or flattened control arms can result. Replacing your bushings, while not an immediately obvious modification, returns that “new car feel” to your twenty year old ride. I mean that. My ae86 rides like new and knowing that I wish I’d done it years ago. It’s that good.
Up until this point, the modifications we’ve talked about have been pure suspension modifications in the truest sense. They were all moving parts under the car that add to your driving experience. But what if I told you that there were body parts available that would do the same thing? The second, and perhaps most beneficial, set of suspension modifications is chassis reinforcement.
Now, having just said that the ae86’s chassis was great because it had flex…why would I now say that you should reinforce it? Simply put, under severe and repeated loads, the ae86 chassis can actually flex itself to pieces. Also, if you truly want to achieve at-the-limit handling second to none, you have to have a stiff chassis. No matter what you do, you could never reinforce the chassis to the point where it was stiffer than a new car, so my logic is still valid (in a round-about way). Either way, this is the next step and like before, it starts off minor and gets major in a hurry.
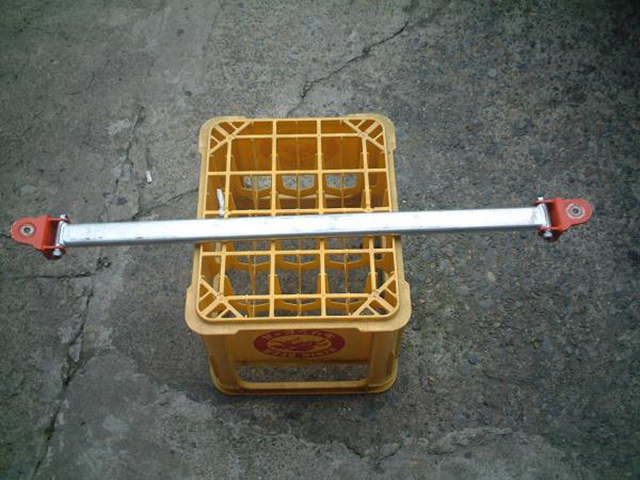
The most common aftermarket chassis reinforcements are bolt-ons. Available for almost any car, these reinforcements are exactly what they sound like…parts that bolt in, usually using OEM mounting holes and equipment. The most common of these are strut tower bars.
These bars tie the tops (and sometimes the bottom) of suspension points together, usually under the hood and in the trunk or hatch. Essentially, when a car goes around a corner, the outside front tire has the most force applied to it. . This force, in turn, pulls on the suspension parts by pushing in against the tire. This causes the strut in the front of an ae86 to pull in at the bottom and out at the top…which basically pulls the outside strut’s top away from the outside strut’s top and causing the car’s front end to flex. The strut tower bar bolts to the strut top, forcing them to move in unison and boxing in the suspension. This takes the slop out of the suspension, and is one of the easiest parts installs you will ever do. There are various styles, makes and models both front and rear, but they all essentially do the same thing. A strut bar isn’t something I’d rush out and buy until I had already done everything else…even with all of the modifications we’ve already discussed the strut tower bar’s effect was barely discernable.
Its definitely doing something, don’t get me wrong…but it took all the suspension work we’ve covered so far to make it noticeable to me. The most common strut tower bars are two and three point styles. Two point styles go from tower to tower, while the three point bar triangulates the two points into the firewall for added reinforcement. When shopping, watch for sloppy joints on the bar you’re buying. It should fit solidly with no play in the system once it’s attached. I’ve definitely seen some bars where, even when tightened down, they still had play in them…which is exactly what we’re trying to get rid of by installing them in the first place. Look to Cusco, Tanabe, GReddy, NAMS and a host of other manufacturers for quality stuff, though as near as I can tell they’re all just copies of Cusco products, though poor.
For rear bars there are dozens of different styles, though my personal fave is the Techno Pro Spirit bar because it requires no metal work or drilling to install unlike most rear bars. There’s a new one on the market that looks like a big X that ties the car together at the rear seat bulkhead, called “The Miracle Bar”, and it’s certainly popular as well.
I may have opted for a Cusco three point bar, but I wanted a Shakitto bar. This chassis reinforcement piece is gaining popularity in Japan, so you should be aware of it. Essentially a strut tower bar, the shakitto plate and bar system uses metal plates that tie the strut towers, firewall and fenders together for a high level of reinforcement, and then tie them together using a massive hollow aluminum square bar.
It takes up less room by moving the pieces to the rear of the engine bay, and looks like it would better clear my 4agze than the Cusco piece I have. It’s also supposedly superior to the three piece strut bar commonly found on ae86’s. Mr. Kumakura of TPS told me in person that the ultimate setup was a Cusco three point with shakitto plates installed (but no shakitto bar).. Still, I long for the bar and plate design, though I can’t find anyone who sells it. Originally created by Hai Racing, the only manufacturer to ship to North America is NAMS, and their plates don’t have bar attachment provisions.
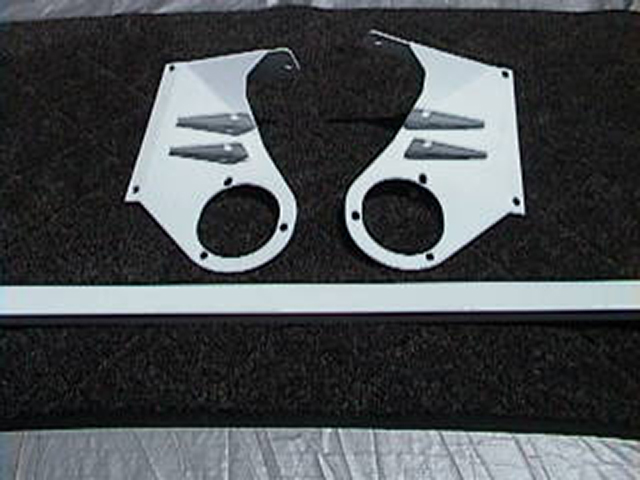
Another chassis reinforcement device popularized in Japan and only available in North America through NAMS or Ueo Style is the Garchirri support. This piece is a Y shaped brace that bolts under your fenders.
Tying from your door hinge bolts to directly above your strut mounts on the inner fender, these braces are designed to stop the front half of the car’s engine bay from flexing up and down during hard cornering. While I’ve never actually driven a car with them equipped, it does seem like a good idea because you can feel the front of the car flexing around if you push the car hard enough.
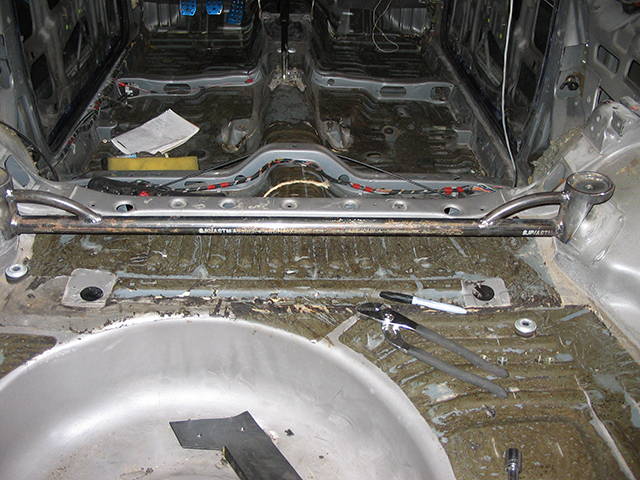
Do Luck, a high end Japanese market innovator, has a series of chassis bars that may also interest you. I’m sure you’ve seen them too. These bars run across the car horizontally, inside the passenger compartment and underneath the car, and their purpose is to stop the middle of the car from flexing. They bolt into OEM holes in the rocker rails and fit around the transmission tunnels, both above and below. Usually quite polished and shiny, these bars really attract attention…and they really work! Keep in mind that the transmission tunnel is the center of the ae86 chassis, and every piece of flex that happens in the chassis pulls on the transmission tunnel. Anything you can do to keep this piece of the car from flexing stops the rest of the car from flexing, and there has been many JDM brace innovations for this area…Do Luck was just the first. They also created the V-brace, which is a brace that bolts inside the engine bay and ties the sides of the fenders and frame together from side to side across the car. Apparently this is a common spot of weakness in most cars, judging by the huge list of makes and models they make it for and how often I see it featured as equipment on magazine cars.
After those major reinforcement pieces, there are hundreds of little tie bars you can buy or fabricate for the ae86 chassis. Jubiride makes dozens just by themselves, never mind Cusco, Revolver, Silk Road or any of the other manufacturers! Everything from bumper tie bars to radius rod tie bars to tranny bars, floor bars and literally hundreds of styles of rear trunk/hatch tie bars for C pillars, floors, seats, fenders, rear trunk panels etc. It’s astounding what people will tie together, let me tell you. It’s literally too much to even get into on a webpage…just shop around and you’ll see them.
They all work in some way or another because they’re all reinforcing a twenty year old car. I mean, you can make these at home if you’re handy or creative enough.
That pretty well ends the easy stuff. Everything from here on in is still chassis reinforcement. It’s just a little less user friendly in installation. Probably the best example of this is a roll cage. While designed to protect the driver from accidents on the track, a roll cage massively reinforces the chassis. It’s like a jungle gym in your car. Have you ever tried bending a jungle gym? Starting at a three point style and going up to as many as you desire, a roll cage is a great chassis investment. I caution a few things though. First off, roll cages are heavy, so you’re packing in weight that you can’t take out. Secondly, they dramatically affect the drivability of your car…you just can’t take five friends out for dinner in a roll caged car. Thirdly, if you bolt them in and drive them hard the car will actually start to stress crack around the bolt holes of the roll cage where they go through the car because these are now weak points, so weld the cage in if you’re serious. Also, don’t forget to pad the cage and/or keep it away from your head. Odds are good that you probably won’t be wearing a helmet on the street, and smacking your head into a steel bar SUCKS. Make sure you get it built by someone who’s certified. Make sure it’s built to certification! Make sure the certification is tagged on it so you don’t get harassed by track officials.
Another interesting chassis modification started by the Japanese is expanding foam. I first saw this in Option magazine, and watched it in action at Toysport in California. Basically, every part of the chassis of an ae86 is accessible from the interior of the car. A car is essentially a few beams laid out in an H pattern with connecting floor panels in between, and the ae86 is no exception. So, the easiest way to reinforce the floor is to make sure the H frame doesn’t flex around. An easy way to do that is to fill it with expanding foam. Now, before you rush out to Home Depot and buy all the Mono you can find, there are a few provisions to this you should be aware of. First and foremost, regular expanding foam will not work for this application. You’re going to need to talk to a local mould maker or plastic modeler who stocks it for their application and get a hold of their supplier to see what densities it comes in. Mono and other such crack filling foams have a low density, which means they can handle low loads, stresses or weights on them. I did a little research into it and found a supplier who could go as high as fifty pounds per square inch…which is huge! I had to buy a pail of it (twenty liters or 5 gallons for you imperial guys) but that would probably do several cars so you can get your friends to go in on it with you and split the cost. You’ll want to remove the entire interior of your car, and tape off any areas you don’t want foam to escape from. You still have to leave holes for it to expand from, so leave the tops open and break off any foam that sticks through once the foam dries. Pour it in the H rails, the rockers…anywhere you want to reinforce. I do have two words of caution however. First off, if you get the density too high and the car still has enough flex in it, the car will break apart around the foam reinforced areas because that is now the focal point of the flexing. Secondly, and the reason I never did it, is that nobody could tell me what the chemical reaction did in terms of acidity or other bi-products. Chassis reinforcement is all good, but I don’t want to do it if the reinforcement chemical is going to eat the car from the inside out! It’s something to think about before you jump into the project, anyway. If it’s on a race car, or a car you don’t value, go for it…but if you’re like me and value your car, be careful because there’s no way to get it out or undo what you’ve done. Read my SR20 car build for more info on this technique.
The last chassis reinforcement trick you should be aware of is spot welding. As you may know, your car consists of hundreds of stamped pieces of metal that have been spot welded together in a pattern, layer over layer. Because the welds are spotted and not seamed, they actually reinforce the chassis more. It’s like denting a pop can versus creasing a pop can…try it if you don’t believe me. Take a flat bladed kitchen knife and push a crease in the length of a pop can in one nice, neat line, versus tapping several dents into the can in a similar line and you’ll instantly see what I’m on about.
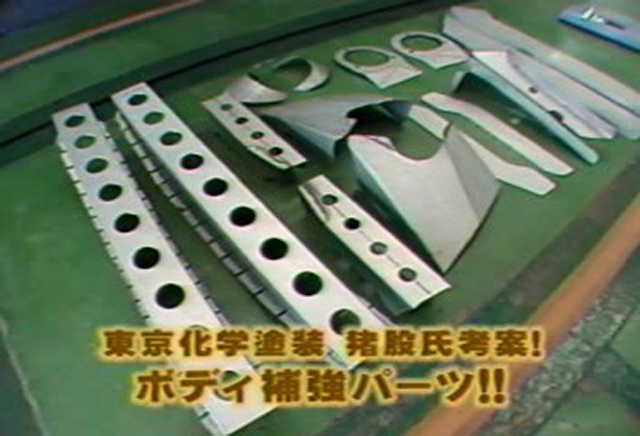
The central idea here is, your car has spot welds all over it…enough to hold the car together under normal driving conditions forever. But, when the car starts flexing under insane cornering loads on the suspension parts we’ve talked about, these welds start to pop apart, which causes the car to flex even more. So, the easy way to reinvent the car is to spot weld it even more! One option is to install a weld-in reinforcement kit which is a series of panels designed to reinforce the weak points of the car’s chassis like the floor underneath the front seats (where it’s flat) and the inner fender where it meets the firewall.
These kits are only available in Japan (as far as I know) and represent a great investment of time and racing experience from several well known shops there. The other option is to tear the car down to its bare chassis, put it on a stand called a rotisserie. This keeps the car off the ground, and allows you to rotate it three hundred and sixty degrees in the air so you can work on all angles of it. You then sandblast the car bare and systematically add welds every inch or two over every body seam you can see. However, you have to be careful when you do this because welds shrink metal together as they cool, and if you do enough welds in one spot, my understanding is you can actually pull the car apart or twist it rather than reinforce it. It’s not unheard of to go well over fourteen hundred individual welds when doing this, so it’s not going to take you an afternoon…but this is supposedly the way to get the maximum reinforcement into your ae86 chassis. I’ve heard (though never experienced) that this will turn a flexible ae86 into a stiff civic chassis in no time, and that it is night and day. Unfortunately, it represents a huge amount of time and money to sink into a twenty year old car so it’s not for the weak at heart. Keiichi Tsuchiya has done both of these modifications to his personal street ae86, so they must be good!
The last, and highest, echelon of ae86 chassis and suspension tuning is adjustability. This may seem like a small detail that doesn’t deserve its own section, but the ramifications of adjustability are huge and not for the uninitiated. If you don’t know or understand what you are doing with adjustable suspension parts, odds are good that you will set up the car incorrectly and that it will be a disaster to drive. In short, if you don’t need it for some kind of competitive racing or know what the adjustments do, don’t do it…it’s as simple as that.
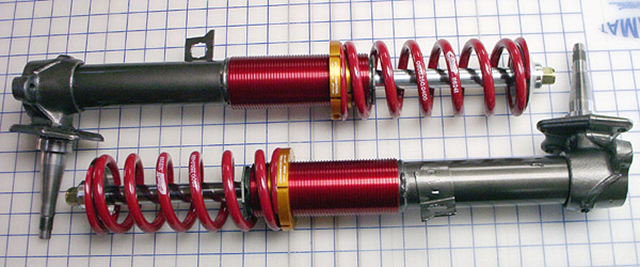
Probably the first and simplest adjustable part that people attach to their ae86 is coil over front struts. Technically they’re not coil over shocks in the truest sense…essentially this gives the user control over the ride height of the front of the car. This may seem simple enough, but it also controls the weight distribution of the car, and the spring-relative shock travel which are all touchy subjects if you’re at the limit on a track. In Japan, there are several shops that turn the rear shock system into coil-over shocks as well, though this seems like a bit of a dodgy idea with the way the weight suddenly gets suspended off a tiny little pin originally designed to locate the shock on the axle and bear no weight at all.
I’ve seen a couple of different grass-roots rear height adjustable setups over the years, but they were all homebrew systems with questionable reliability. It is interesting to me then that GReddy has recently entered the North American market with an ae86 suspension that features balanced shocks, springs and struts complete with four corner adjustability which is probably the first time this has been offered by a major manufacturer, much less on our shores. They seem to have perfected one of the home-brew rear suspensions I saw so many years ago, enough that they’re confident to sell it anyway. This piece essentially puts a height adjuster underneath the rear springs, rather than relocating the spring to the shock mount. Most of us would only use this system to put the car in the weeds at car shows and never corner weigh the car for competition, which is what it’s really for. I’m quite interested to see what this new line from GReddy can do on a track.
Probably the next most popular adjustable setup is adjustable four link rear bars for the axle. This modification is really only intended for serious, serious road racers. All it allows you to do is add or subtract wheelbase from the chassis. Everyone knows that by putting your feet further apart, you become more stable and resistant to tipping…it’s why tripods work. The same holds true for wheelbase on a car…the more you have, the better the car drives. This is always “to a point” of course, but the general idea holds true. This modification allows you to add something like 5mm of wheel base (or subtract it…but why would you want to do that?) to the car, which has to be huge under racing conditions. Other than that most of these four link systems have pillow ball end links which replace the rubber bushings you had before. This takes all the slop out of a suspension which is great for smooth roads and high level competition. But it’s bad for bumpy roads because the car rides not just like a camel, but a metal-on-metal-jointed camel with no lubrication and a serious hangover. Because of the adjustability, there is plenty of room to screw up your rear suspension settings and have the axle pointing all kinds of directions but the right one in the quest for wheel base, so really think this out before you leap.
The same is true for the front, where a lot of people replace the lower control arm and radius rod locator system with one similar to Cusco’s. It has full adjustability for caster, as well as zero-slop pillow balls and control arm length adjustability…but most of us would never find a way to use this piece to its full potential. Length adjustable lower control arms can help you add track to the front of the car for stability, but this piece is overkill for the street.
Lastly, the craziest trend in Japan that seems to be catching on is independent rear suspension. The ae86’s live-axle setup is a hindrance in road racing (as I mentioned at the beginning of this article) because, simply put, it lacks control…when one side goes down, the other tries to go up like a demented see-saw. It’s just the nature of its design.
There are at least two Japanese manufacturers who have decided to correct this problem by offering Nissan s14 rear end suspensions for the ae86. This isn’t a weld in proposition. It’s literally a bolt-in space frame that locates the s14 independent dif under the car. Think about it for a second…this means you get an OEM limited slip, retain the factory suspension mounts and requirements, and gain rear independence and big disk brakes! Because it’s independent, you also get fully adjustable rear axle caster, camber and toe to dial in the car. Of course, we’re talking thousands of dollars here, but I imagine the dynamics of an independent rear are light years above the best solid axle ae86’s around…and it’s certainly something to put in your pipe and smoke if you’re into that sort of thing. Read my SR20 car build for more info.